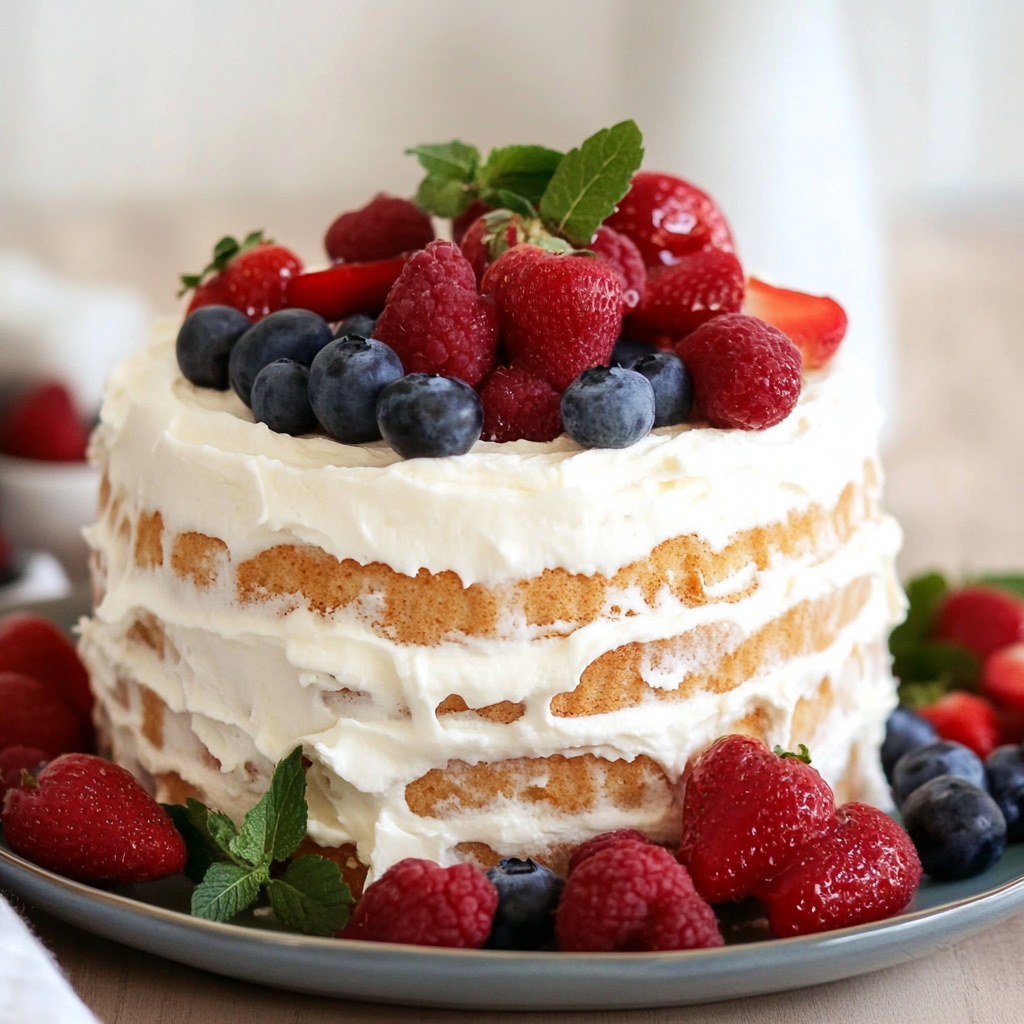
There’s something undeniably magical about a Vanilla Wafer Icebox Cake. Imagine layers of creamy, dreamy goodness interspersed with crunchy wafers that soften into a delightfully tender texture after a night in the fridge. delicious dessert options The aroma wafts through the kitchen like a sweet siren call, promising a dessert experience that’s nothing short of heavenly. For more inspiration, check out this Ultimate Chocolate Cake Recipe recipe.
Picture this: You’ve just had a long day, and all you want is to dive into something that tastes like childhood bliss. This Vanilla Wafer Icebox Cake is not just a dessert; it’s an invitation to relive those joyful moments during family gatherings where laughter filled the air and everyone was happily devouring this delectable treat. comfort food favorites.
Why You'll Love This Recipe
- This Vanilla Wafer Icebox Cake is incredibly easy to prepare and requires no baking at all
- The flavor profile balances rich vanilla with light, airy textures for a delightful experience
- Its stunning layers make it visually appealing, perfect for impressing guests
- Versatile enough for any occasion, from summer picnics to holiday feasts
Creating this cake has always brought smiles to my family, especially when my kids take their first bite and their eyes widen in delight.

Essential Ingredients
Here’s what you’ll need to make this delicious dish:
- Vanilla Wafers: These sweet, crunchy cookies are the backbone of the cake; choose fresh ones for best results.
- Heavy Whipping Cream: Opt for high-fat cream for a rich, stable whipped topping that holds its shape beautifully. For more inspiration, check out this Baileys Irish Cream Cheesecake recipe.
- Powdered Sugar: This adds sweetness without the grainy texture; sift before using for smooth incorporation.
- Vanilla Extract: Use pure vanilla extract for an authentic flavor punch that elevates your cake.
- Milk: Whole milk works best here, adding creaminess that balances the cake’s texture perfectly.
The full ingredients list, including measurements, is provided in the recipe card directly below.
Let’s Make It Together
Prepare Your Cream Mixture: Start by pouring heavy whipping cream into a mixing bowl. Add powdered sugar and pure vanilla extract. Whip until soft peaks form and the mixture looks fluffy and inviting.
Soak Those Wafers: In a shallow dish, pour milk and dip each vanilla wafer briefly—just enough to moisten them without turning them mushy. Think of it as giving them a warm bath before they join the party.
Create Layers of Joy: In your serving dish, start layering by placing soaked wafers at the bottom. Spread a generous layer of whipped cream over them, creating a cloud-like topping.
Repeat Until Complete: Continue layering wafers and whipped cream until you reach the top of your dish. End with a lavish layer of whipped cream because who doesn’t love more cream?
Chill Out!: Cover your masterpiece with plastic wrap and let it chill in the refrigerator for at least 4 hours or overnight if you can resist temptation that long! The magic happens as the flavors meld together beautifully.
Serve & Enjoy!: When ready to serve, slice into pieces resembling creamy heaven on plates. Garnish with additional crushed wafers or fruit if you’re feeling fancy!
This Vanilla Wafer Icebox Cake will undoubtedly become your go-to dessert for its simplicity and delightful taste, making every gathering feel special. Italian-inspired meal ideas Get ready for compliments galore!
You Must Know
- This Vanilla Wafer Icebox Cake is not just a dessert; it’s a magic trick for impressing guests
- Its layers are reminiscent of summer days and childhood nostalgia, making it a delightful end to any meal
- Serve it chilled for the best experience!
Perfecting the Cooking Process
To achieve perfect results, layer the vanilla wafers and creamy filling in a well-greased dish. perfect side dish for gatherings Allow it to chill overnight to set properly, creating that dreamy texture everyone loves.
Add Your Touch
Get creative by adding different flavors like chocolate pudding or fresh berries between layers. You could also use whipped cream instead of cool whip for a richer taste!
Storing & Reheating
Store your Vanilla Wafer Icebox Cake in an airtight container in the fridge. It tastes best cold, so avoid reheating—just grab a slice whenever you crave something sweet!
Chef's Helpful Tips
- For a flawless Vanilla Wafer Icebox Cake, use fresh ingredients and chill it overnight for optimal flavor
- Layering should be even to ensure every bite is deliciously balanced
- Experiment with flavors like banana or strawberry for a fruity twist!
It’s funny how my kids think this cake is some kind of wizardry. They believe I can summon dessert from thin air, and their faces light up each time they see it come out of the fridge!
FAQ
What makes Vanilla Wafer Icebox Cake so special?
The creamy filling combined with crunchy wafers creates an irresistible texture.
Can I make this cake ahead of time?
Absolutely! It’s best when prepared the night before serving.
How long does Vanilla Wafer Icebox Cake last?
It can last up to five days when stored properly in the fridge.
Vanilla Wafer Icebox Cake
5 Stars 4 Stars 3 Stars 2 Stars 1 Star
No reviews
- Author: Mery Mack
- Total Time: 0 hours
- Yield: Serves 8
Description
Vanilla Wafer Icebox Cake is a delightful no-bake dessert that combines layers of creamy whipped filling with crunchy vanilla wafers. This nostalgic treat is perfect for reliving childhood memories and is sure to impress at any gathering. With its simple preparation and rich flavor, it’s an ideal choice for summer picnics or holiday celebrations. Chill it overnight to let the flavors meld, and enjoy a slice of pure bliss!
Ingredients
- 1 box (11 oz) Vanilla Wafers
- 2 cups Heavy Whipping Cream
- 1 cup Powdered Sugar
- 2 tsp Pure Vanilla Extract
- 1 cup Whole Milk
Instructions
- In a mixing bowl, whip heavy cream, powdered sugar, and vanilla extract until soft peaks form.
- Pour milk into a shallow dish. Dip each vanilla wafer briefly in the milk.
- In a serving dish, layer soaked wafers followed by whipped cream. Repeat layers until all ingredients are used, finishing with whipped cream on top.
- Cover and chill for at least 4 hours or overnight for best results.
- Serve chilled, garnishing with crushed wafers or fresh fruit if desired.
- Prep Time: 20 minutes
- Cook Time: None
- Category: Dessert
- Method: No-bake
- Cuisine: American
Nutrition
- Serving Size: 1 serving
- Calories: 320
- Sugar: 15g
- Sodium: 150mg
- Fat: 24g
- Saturated Fat: 14g
- Unsaturated Fat: 8g
- Trans Fat: 0g
- Carbohydrates: 30g
- Fiber: <1g
- Protein: 3g
- Cholesterol: 80mg

